
-
Usein kysyttyä-sisältö suomeksi: Usein kysyttyä, Wattinen Älytermostaatit: Mobiilisovellus
-
1. Registration and login
-
You can get started by downloading the app from Apple's App Store or Google Play Store. Register in the app by providing your phone number and logging in with the one-time password sent via text message.
The app will remember your number for future logins. However, if you ever log out, select "Log In" and enter your phone number to receive a new password via text message. Enter the password you receive into the app.
Note: Logging into the Wattinen app has been limited in some countries due to information security reasons. Before any trips to the following countries, app users should always try to consider their heating needs in advance:
Belarus, China, Cuba, Iran, Israel, North Korea, Palestinian Authority, Russia and Syria.
2. How does the Wattinen mobile app work?
-
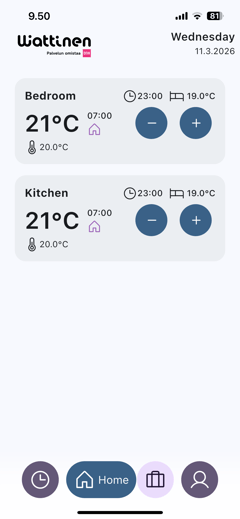
With the Wattinen Android and iOS app, you can see the current temperature, adjust the target temperature room by room, and set schedules for the target temperature.
During your first login, you can link your home’s thermostats with the app. This can be done either by scanning the QR code of one thermostat or by entering the text below the QR code of one thermostat into the app.
The default temperatures set for the property will be visible in the app when you log in for the first time. You can make any desired changes and schedules within the limits agreed upon for the property.
-
You can set target temperature schedules for your home, for example, for night and daytime. Research shows that we sleep better at slightly cooler temperatures. You can modify your schedules at any time later.
-
3. Can the heating of one apartment be controlled by multiple linked smartphones?
-
One apartment can only be controlled by one smartphone at a time. If another person in the same apartment links their smartphone to the app, the link from the previous device will be removed. This ensures that a new resident always has control over the heating adjustments after the previous resident.
4. Temperature drop for a longer absence
At the top of the home view, teal blue color indicates whether the Home mode or the Away mode is active.

The Home mode is the default state, in which all selected temperatures and schedules for the apartment's rooms are in effect. In the Away mode, a cooler temperature is set for all rooms. The Away-mode temperature is property-defined (usually 17°C) and residents cannot modify its value themselves. The Away mode saves energy when the apartment is empty for an extended period, while still maintaining a sufficiently high temperature to prevent moisture buildup.
The Away mode is activated by pressing the Suitcase icon. The cooler temperature takes effect immediately after the schedule for the Aways mode has been defined. The Away mode at the bottom part of the screen will also change to teal blue color to indicate that it is the selected mode.
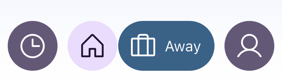
The transition from Away mode back to Home mode needs to be scheduled in advance. This is done by pressing first the Away icon and then the calendar that opens thereafter. Choose the date for returning back to Home mode and press OK. Next choose the time, when you wish the Home mode settings to be working again and press OK. The scheduled transition will occur automatically at the desired time. This way, the temperatures will be set to the default state (Home mode temperatures and schedules) when returning from a trip, for example. At that point, the Home mode icon will also be activated again and will be displayed in teal blue color.
5. Temporary adjustment of room heating
You can adjust the target temperature for each room in the home view using the plus and minus buttons next to it. This temperature will remain in effect only temporarily, until the next scheduled heating starts in the room. Note: When you have adjusted the temperature, the room will heat up/cool down with some delay.
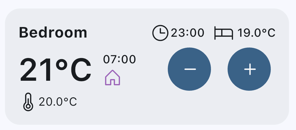
In the room information, you can also see the most recently measured temperature above the plus and minus buttons, next to the thermometer icon. Below the target temperature, you can see the heating schedule for that room for the day (e.g. Sleep mode or Away mode). If you want to schedule temperatures in the rooms permanently, please refer to the instructions for scheduling heating.
6. Scheduling heating
-
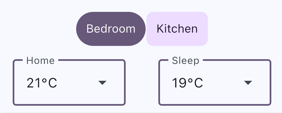
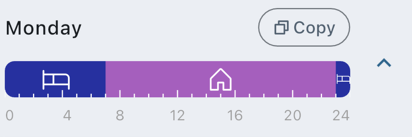
1. Select the desired room from the home view by pressing its icon or go to Scheduling by selecting the Clock-icon at the bottom part of the screen. In the scheduling view for the selected room, you will see the schedules for different days of the week. The selected room will be highlighted in darker color at the top of the page. You can switch rooms, and the newly selected room will be highlighted in darker color, showing its scheduled times below it for each day of the week.
-
2. Below the name of the selected room, you will see the temperatures for Home mode and Sleep mode. You can edit the target temperatures for these modes using the dropdown menu that opens next to the numeric value and select a new target temperature.
-
3. Choose the desired day of the week for which you want to create schedules. You can later copy the schedules to other days of the week as well as to other rooms.
You will see the existing schedules for the selected day, including the daytime Home mode temperature and possibly also the Sleep mode temperature and Away mode temperature for the chosen times.
-
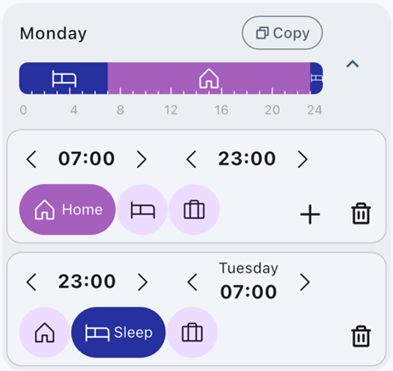
4. You can edit the schedules for the chosen day by pressing arrow icon on the right. This will open the editing view below the current schedules. You can adjust the times of the schedules by pressing the arrows to move time forward or backward.
-
5. You can create a completely new schedule for the selected day using the plus icon. Set the start and end times for the new schedule by pressing the arrows to move time forward or backward. Also, select which mode the new schedule applies to (Home/Sleep/Away).
-
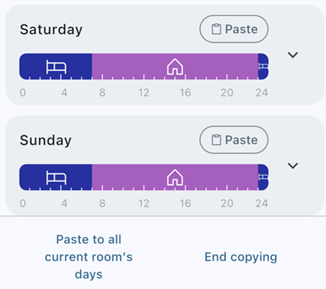
6. If you want to copy the schedules you created for a specific day also to other days of the week or to other rooms, first select the Copy icon next to the day you want to copy. Next, select each day of the week where you want to copy the same schedules by pressing the Paste icon next to each day. The schedules will then be copied to the selected days. You can also choose the option "Paste to all days in this room" at the bottom of the page. Finally, press Save. When you are finished, select Stop copying.
-
7. If you want to copy a schedule you created also to other rooms, first select the Copy icon next to the day you want to copy. Then, from the top of the page, select another room where you want to copy the same schedules. The selected page icon will turn blue. Next, select each day of the week in that room where you want to copy the same schedules by pressing the Paste icon next to each day. The schedules will then be copied to the selected days. You can also choose the option "Paste to all days in this room" at the bottom of the page. Finally, press Save. When you are finished, select Stop copying.
7. How can I rename a room in the app?
-
Select the room on the app's home page and press the room name. The “Room Name” view will open. Press the room name to activate the text input field. Edit the name and finally press “OK” to save the changes.
-
8. How do I change the theme/mode between light and dark?
Open Settings from the Person icon at the bottom right corner of the home page. You can select a theme/mode by pressing the Theme options at the top of the page. The light theme is represented by the Sun icon and the dark theme is represented by the Moon icon.
-
9. Why does the thermostat show a different target temperature than the app?
-
There is a slight delay in the connection between the thermostat and the app. If the temperature has been recently adjusted, the thermostat and the app may display different target temperatures. If you have not adjusted the temperature and this happens, please contact Wattinen customer service.
10. What are the different temperature readings provided by the Wattinen app?
-
The large numbers always show the target temperatures for the room, while the smaller numbers displayed on the side indicate the measured room temperatures. The room temperatures are obtained either from the measurement data of a separate condition sensor located on a wall in the middle of the apartment or the reading is estimated with a calculation based on the thermostat's temperature reading.
11. What should I do when I move out of a Wattinen apartment?
If you have activated the Wattinen mobile app: Release the link to your apartment in the app Settings. Go to Setting from the home page Person icon located at the bottom right corner. Select "Settings" and then "Release apartment."
If you have not used the app, you do not need to do anything.
12. What information does the Wattinen mobile app collect?
-
The use of Wattinen does not require extensive collection of personal data.
The app is activated by confirming your phone number and entering a verification code. It is possible to use the app without strong authentication.
The information presented in the app is based on the data provided by the resident themselves as well as on the information given by the housing company to DNA during the implementation of the service agreement with Wattinen. The data processed in the app may include:
- - The ID of the device used for the app, the operating system, and the version of the operating system
- - Information provided by the resident through the app, such as registration details (name and phone number), login information, room names, and QR codes or serial numbers of smart thermostats
- - Touch commands made by the resident while using the app, room-specific schedules, target temperatures, and related time period data
- - Information regarding the use of the app, language selection, possible alerts, and location data
- - Information collected in connection with the app through cookies and other similar technologies
-
When using the app, DNA collects information about its usage. This includes data such as when and how the app is used, what content is viewed in the app, information about the performance of the network and the device, specific device information, IP address data, operating system, and language selection.
The information is used, in addition to what is described in this statement and the Wattinen privacy policy, for the development of the app: to respond to user requests and interests, for content targeting, product development, personalization, general or individualized and targeted marketing messages and offers, as well as for analyzing and statistics on app usage.
The app may request permission to send notifications to your device. The purpose of such notifications is to provide you with additional information about your Wattinen services, interesting and relevant topics, or offers.
DNA complies with the applicable laws and regulations in Finland regarding data processing, as well as with instructions from authorities. Your personal data will be processed as described in this statement and the Wattinen privacy policy.
13. How can I request device data regarding devices in my apartment?
Settings can be found behind the Person icon in the bottom right corner of the homepage. Within Settings, select "Request device data”. Then, enter the email address to which the information should be sent (within 24 h) and press “Submit”.